Resource Limits Management Plugin
Contents
Overview
We introduced a new plugin - Resource Limits Management - that allows Domain Administrators to manage resource quotas, and users to change resource limits. The extension helps to avoid such situations when a user has extra resources that are not used but accounted in billing. Or when a user has utilized all the available resources and now needs more. In either of these cases, a user would have to request Administrator to change the resource limits. With the new plugin a user gets access to resource limits, and Administrator can manage resoure quotas via UI.
The extension uses two backend plugins:
- the µAPI Gateway plugin developed by us to help developers to create extensions for CloudStack using any programming language.
- the Resource Limits Management backend plugin that extends CloudStack API with additional endpoints.
In general, the plugin works as it is presented in the figure below:
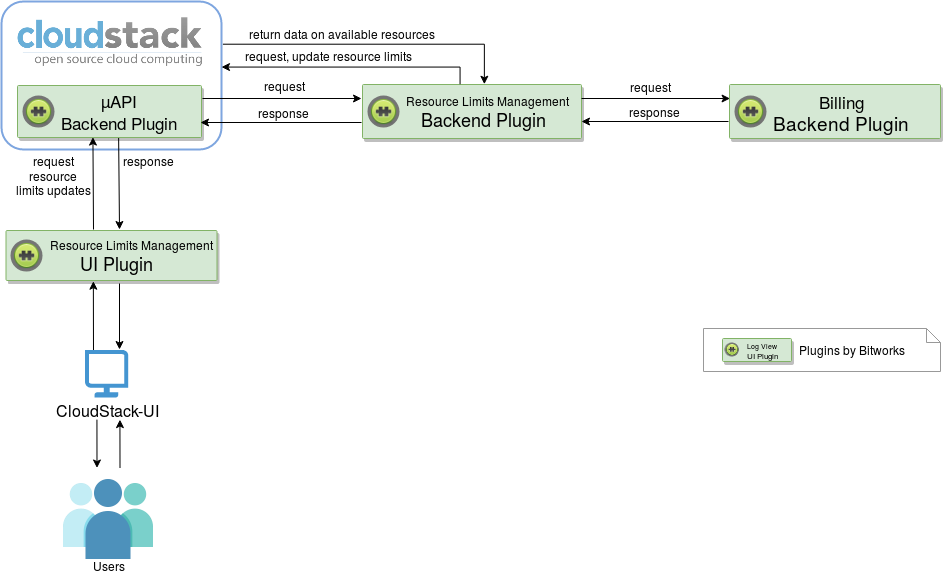
Users interact with the plugin via CloudStack-UI. They update limits and request resources for the account. The µAPI Gateway plugin gets installed to CloudStack. The Resource Limits Management backend extension is plugged in to CloudStack via µAPI Gateway and creates new endpoints. The Resource Limits Management UI-plugin uses them to send user’s requests for resource limit changes to CloudStack. The Resource Limits Management backend plugin checks user’s available resources with CloudStack. Besides, it requests the billing system to confirm that there are enough financial resources for the updates. On receiving the confirmation from the billing system, the Resource Limits Management backend plugin updates resource limits. The UI-plugin displays the updated limits to the user via CloudStack-UI.
Below, you can find an overview on deploying the Resource Limits Management plugin.
Plugin Deployment
The instructions on plugin deployment are presented at the project wiki-page.
To enable the Resource Limits Management UI-plugin you will need to:
- Install and configure the µAPI Gateway backend plugin in CloudStack.
- Deploy the Resource Limits Management backend plugin.
- Enable and configure the Resource Limits Management UI extension via the
config.jsonfile (see the configuration guide).
Managing Resource Limits via UI
Resource limits management by Domain Administrators
After the plugin is enabled, Domain Administrator can open “Resource quotas” under the “Accounts” menu. In this section, Administrator can view and set resource quotas. To edit resource quotas Administrator enters desired minimum and maximum values for a resource parameter.
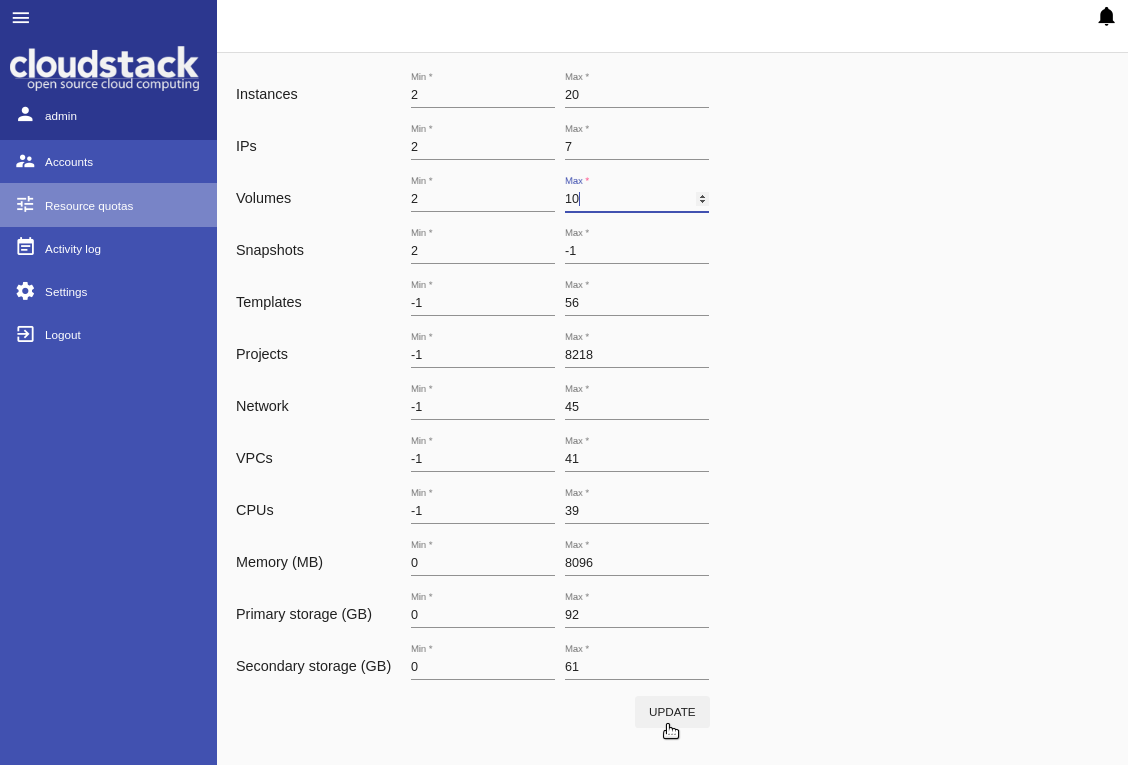
[-1] stands for any value, that means a resource parameter with [-1] is unlimited. Such parameters are not available for users to change resource limits.
Administrator sets resource quotas for all accounts in the domain.
Changing resources by users
After the plugin is enabled, a user can change resource limits in case of the lack of resources or, alternatively, nonuse of extra resources. To send a request a user goes to the Resource usage panel under the Virtual Machine section and clicks «Update resources».
In the appeared modal window, a user can see resource parameters and a slider for each parameter. The scales are limited in accordance with the quotas set by Administrator. A user can move a slider within the quotas to change a resource parameter value. Then click «Update» to change the resource limits.
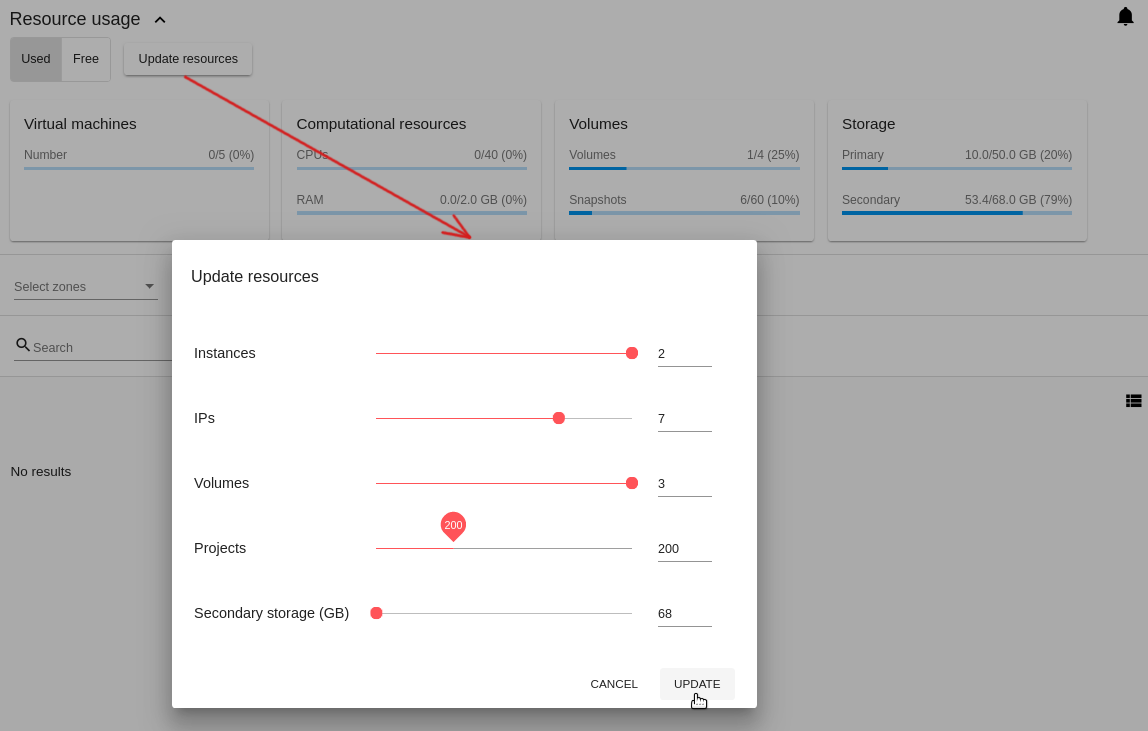
Unlimited resources (set by Administrator as [-1]) are not listed among the resource parameters. That means they are not available for changing.